Start a QC Session for a Standard Data Extract Job
Using the QC module, you can QC a standard Data Extract Job. This topic describes how to start a QC session for a Standard Data Extract Job and assign the appropriate options for the QC session.
You can also start a QC session for a Streaming Discovery Job and a Standard Processing Job. For more information, see Start a QC Session for a Streaming Discovery Job and Start a QC Session for a Standard Processing Job.
|
|
Note: You may be required to start the Dialog Dismisser Utility before creating a session for a Data Extract Job. For more information, see Use the Dialog Dismisser Utility. |
-
In the eCapture QC main window, on the File menu, select Create Session for eCapture Jobs(s).

The Select Data Extract Job(s) dialog box displays with the Clients Tree View collapsed.

Note: For both Processing Jobs and Data Extract Jobs, the Job selection list shows only those Jobs in which the QCed item count is less than the Total item count. To show all the jobs, select Show All Jobs.

-
(Optional) Select Sort by name to sort the Clients by name. When this check box is not selected, the Clients are sorted by ID.
-
Expand the Client in the Clients Tree View on the left.
-
Select one or more Data Extract Job(s) from the selected Client. The Data Extract Jobs list populates with the Client’s completed Data Extract Job(s). If required, click the Case (Project) Name column to sort two or more Jlobs. Click
 to restore the default order
of the Data Extract Jobs.
to restore the default order
of the Data Extract Jobs. -
Click OK. The Start QC Session dialog box appears.
-
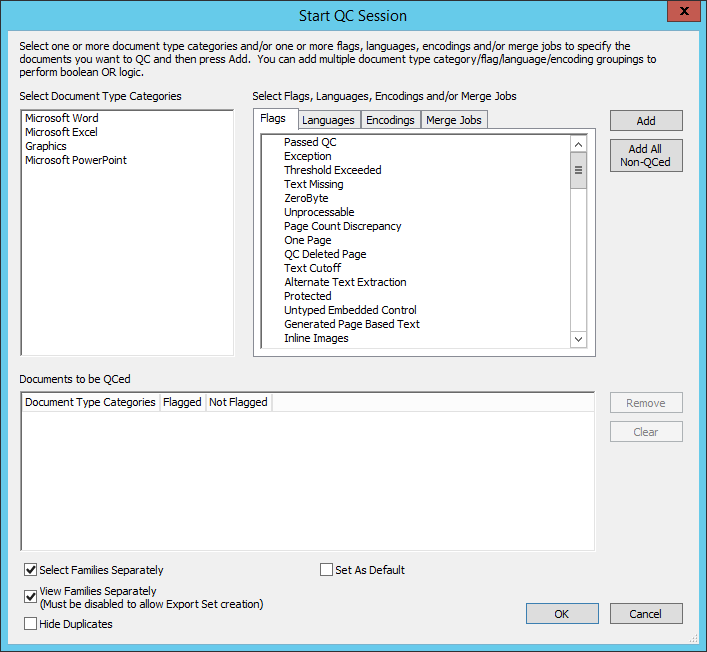
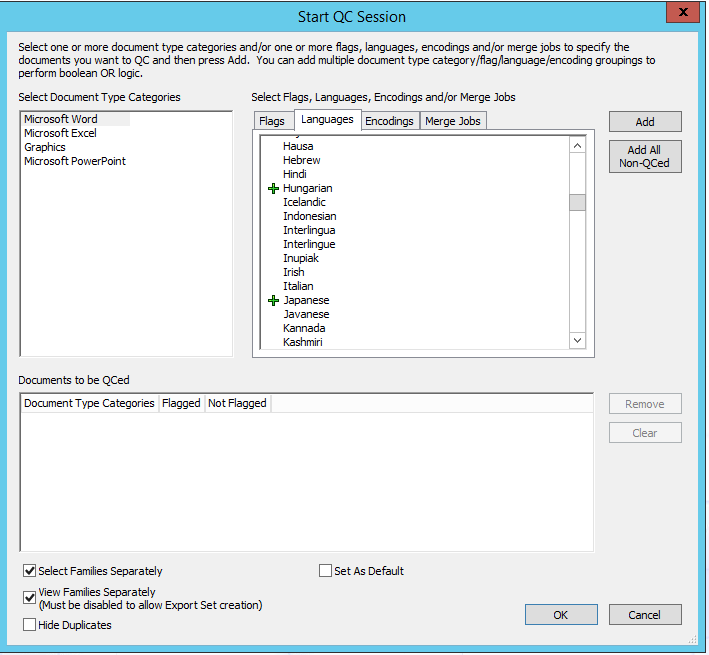
By default the two options, Select Families Separately and View Families Separately are both selected. These options are not mutually exclusive. The "Select" option affects selection; whereas the "View" option affects the positioning of the messages in the Documents window.
Note:"Families" refers to parent/child relationships.
- Select Select Families Separately to have each item in the record table treated as its own entity. When sorting and searching is performed, this option then treats each item separately.
- Clear Select Families Separately if you want the search and sort results to apply to all items associated within the family. Example: A Child is flagged with Passed QC, and its Parent is not flagged as Passed QC. Therefore, when a search is performed for items "QC", then the search results returns both items.
eCapture displays any families and their attachments in the Documents window. A family will show the expand/collapse buttons (+/-) to indicate it is a document with attachments.
If both Select Families Separately and View Families Separately are cleared, documents are then arranged so that the children are directly underneath their parents in the Documents window.
Select Hide Duplicates to hide all duplicate files in the Documents window that exist in the document session. This is useful for reducing the number of documents requiring QC. This option is cleared by default. When it is not selected, all duplicates are returned.
-
(Optional) Select Set as Default to save the settings for "Select", "View", and Hide Duplicates.
-
Perform the following as required:
-
Select one or more categories in the Select Document Type Categories list box.
-
Click the Flags tab.
-
Select one or more flags by clicking the flag once (a green plus sign appears). The designated category selected is shown only if it does have the flag.
-
Click the flag twice (a red minus sign appears). The designated category selected is shown only if it does not have the flag.
Note: To clear a selected flag, click the flag with the green plus sign twice or click the flag with the red minus sign once.
-
-
Click the Languages tab.
-
Select one or more languages by clicking the language once (a green plus sign appears). The designated category selected is shown only if it does have the language.

-
Click the language twice (a red minus sign appears). The designated category selected is shown only if it does not have the language.

Note: To clear a selected language, click the language with the green plus sign twice or click the language with the red minus sign once.
-
-
Click the Encodings tab.
- Select one or more encodings by clicking the encoding once (a green plus sign appears). The designated category selected is shown only if it does have the encoding.
-
Click the encoding twice (a red minus appears). The designated category selected is shown only if it does not have the encoding.

Note: To clear a selected encoding, click the encoding with the green plus sign twice or click the encoding with the red minus sign once.
-
Click the Merge Jobs tab.
- Select one or more Merge Jobs by clicking the merge job once (a green plus sign appears). The designated category selected is shown only if it does have the merge job.
- Click the merge job twice (a red minus sign appears). The designated category selected is shown only if it does not have the merge job.
Note: To clear a selected merge job, click the merge job with the green plus sign twice or click the merge job with the red minus sign once.
When one or more merge jobs are selected, it/they appear(s) in the drop-down list of the View toolbar.
-
-
After the categories and/or flag(s) are selected as flagged and/or not flagged, click Add to add the session. The session displays in the Documents to be QCed list. There are three columns in the list: Document Type Categories, Flagged, and Not Flagged.
For example, if you want to see all Microsoft Word documents that passed QC, you would select Microsoft Word in the Select Document Type Categories list box and click Passed QC once in the Flags tab. A green plus sign appears.
-
Click
 to add those categories to the
list whose documents are not flagged as passing QC. The Passed QC
flag then displays in the Not Flagged column.
to add those categories to the
list whose documents are not flagged as passing QC. The Passed QC
flag then displays in the Not Flagged column. -
(Optional) Repeat these steps as many times as required to add additional, multiple category/flag groupings. Each grouping then displays as its own line in the Documents to be QCed list. Boolean OR logic is applied for two or more groupings.
-
If you want to remove a specific grouping, select it and click Remove. If you want to clear all groupings, click Clear.
-
After you are finished creating one or more groupings for a session, click OK. The eCapture QC main window displays and shows the newly created session tab in the Documents window.


You may optionally create additional sessions by simply choosing File > Create Session for eCapture Job(s) or Create Session for ADD Imaging Job(s) from the menu bar. There is no need to exit from QC because you may want to have multiple sessions available for QCing at one time. For more information see Overview: Create Sessions and QC Items.
Changing the QC Main Window Layout
You may change the layout to suit your needs. Simply point, click and grab the title bar or tab of any window to reposition it. A directional icon appears as you drag the window showing you the areas where you can dock the window. Mouse over the location in the directional icon and release the mouse button to dock the window. Click the autohide icon to hide any window except the Image View Area tabbed windows. To restore a hidden window, click its tab. The layout is temporarily changed. The layout may be saved to an .INI file. For more information, see Save the QC Interface Layout.
Related Topics
Start a QC Session for a Standard Processing Job
Start a QC Session for a Streaming Discovery Job